Laptop Not Connecting to WiFi? Welcome to the World of Wireless Connectivity! In this guide, we’ll walk you through the simple yet essential process of resolving this issue and connecting your laptop to WiFi. Think of it as your passport to the digital universe, where the internet becomes your playground and knowledge knows no bounds.
Picture this: You, armed with nothing but your trusty laptop, are about to embark on a journey through the vast expanse of the internet. But before you can set sail, you need to master the art of connecting to WiFi. Fear not, because we’re here to be your digital guides, making the process as easy as pie.
Forget about tangled wires and limitations; with WiFi, the world is your oyster, waiting to be explored with just a few clicks. So, let’s dive in and unlock the wonders of wireless connectivity together. Get ready to surf, stream, and connect like never before!
Table of contents
1. Checking WiFi Capabilities on Your Laptop
Before we embark on our WiFi adventure, let’s ensure your laptop is equipped with the magic wand of wireless connectivity. Think of your laptop as a superhero gearing up for battle, and the WiFi adapter as its trusty sidekick, ready to unleash its powers.
Step into the Tech Lair:
Imagine yourself donning a cape as you enter the hidden chambers of your laptop’s settings. This is where the magic happens! Your mission? To uncover the WiFi capabilities lurking within your device.
Unveiling the WiFi Superpowers:
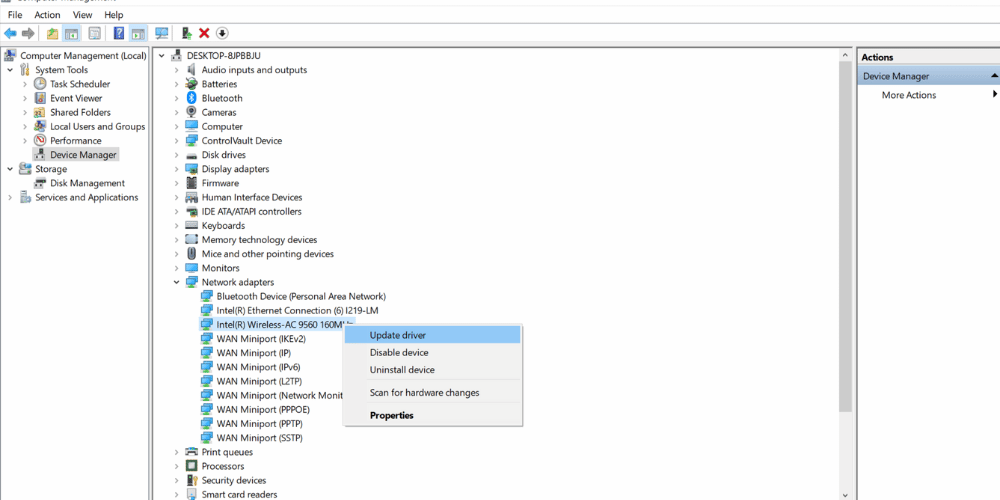
- Windows Wonder: Fire up your laptop and dive into the Device Manager. Here, amidst the digital labyrinth, you’ll find the Network Adapters section. Behold, the WiFi adapter, a tiny yet mighty component that holds the key to your wireless dreams.
- Mac Mystery: For all you Apple aficionados, your quest begins with a glance at the menu bar. Look for the WiFi icon, a beacon of hope amidst the sea of icons. If it’s there, rejoice! Your laptop is armed and ready for wireless conquest.
- Linux Legend: Embrace the power of the terminal as you summon the ancient command lshw -C network. Behold, as the screen reveals the secrets of your laptop’s network hardware. If the WiFi adapter graces the list, victory is yours!
2. Connecting to WiFi on Windows
Discover how to connect your Windows laptop to WiFi hassle-free! Follow our step-by-step guide for seamless internet access.
Step-by-Step Guide
- Turn on Your Laptop:
- Press the power button to start your laptop.
- Enable WiFi:
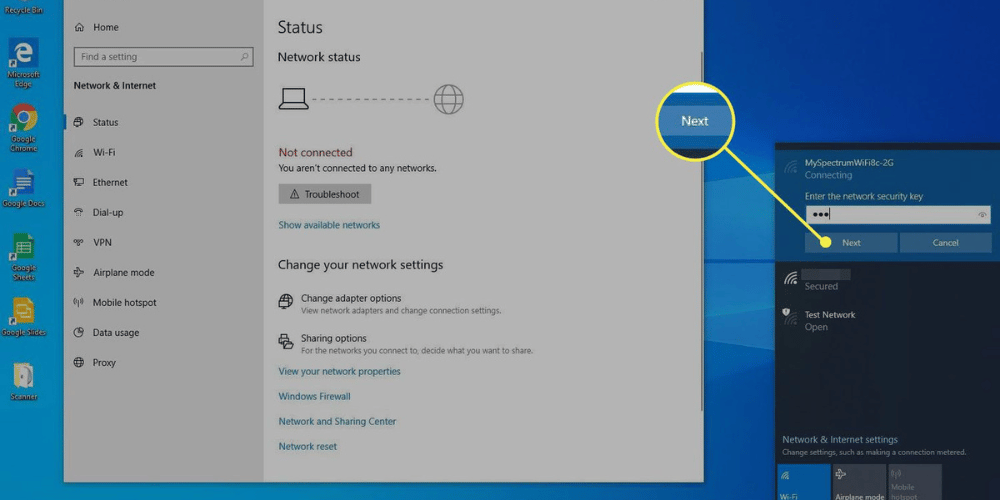
- Look at the bottom-right corner of your screen. Find and click on the network icon, which looks like a small signal bar or a globe.
- Make sure WiFi is turned on. If it’s off, click on the WiFi button to enable it.
- Choose Your Network:
- A list of available WiFi networks will appear. Scroll through the list and find the name (SSID) of your WiFi network.
- Click on your network name to select it.
- Connect to the Network:
- After selecting your network, click on the “Connect” button.
- Enter the Password:
- A prompt will appear asking for the network password. Carefully type in the password. Make sure to get the uppercase and lowercase letters right.
- Click “Next” or “Connect” after entering the password.
- Confirm Connection:
- Wait a few moments while your laptop connects to the network. Once connected, you’ll see the network icon change, indicating a successful connection.
- You might get a message asking if you want to allow your PC to be discoverable on the network. Choose “Yes” if you’re on a trusted network, like your home.
Troubleshooting Connection Issues
If you face any issues while connecting, here are some quick fixes:
- No Networks Found:
- Ensure WiFi is enabled on your laptop.
- Restart your router and laptop.
- Move closer to the router to get a stronger signal.
- Incorrect Password:
- Double-check the password and re-enter it. Remember, passwords are case-sensitive.
- Network Adapter Issues:
- Update your network adapter drivers. Go to Device Manager, find your network adapter, right-click on it, and select “Update driver.”
Following these steps should help you easily connect to WiFi on your Windows laptop. Enjoy your browsing!
3. Connecting to WiFi on macOS
Learn how to connect your macOS laptop to WiFi seamlessly. Follow our step-by-step guide to ensure smooth internet access.
Step-by-Step Guide
- Turn on Your Mac:
- Press the power button to start up your Mac.
- Find the WiFi Icon:
- Look at the top right corner of your screen. You’ll see a series of icons. Click on the one that looks like a radar signal or a fan—that’s the WiFi icon.
- Turn On WiFi:
- If WiFi is off, click the WiFi icon. Then, click “Turn WiFi On.”
- Select a Network:
- A list of available WiFi networks will appear. Look for your network’s name (SSID) and click on it.
- Enter the Password:
- A box will pop up asking for the network password. Type in your WiFi password. Make sure it’s correct (passwords are case-sensitive).
- Connect:
- Click “Join” after entering the password. Your Mac will now try to connect to the WiFi network.
- Confirm Connection:
- Once connected, the WiFi icon at the top right of your screen will show full signal strength. You are now connected to the internet!
Troubleshooting Connection Issues
- WiFi Not Turning On:
- Restart your Mac by clicking the Apple logo in the top left corner and selecting “Restart.” Then, try turning on WiFi again.
- No Networks Found:
- Ensure you’re within range of the router. If the problem persists, restart your router.
- Password Issues:
- Double-check that you’ve entered the correct password. Remember, it’s case-sensitive.
4. Connecting to WiFi on Linux
Connecting your Linux laptop to WiFi is simpler than you might think. Follow these easy steps to get online:
Connecting to WiFi on Linux: A Step-by-Step Guide
- Turn on Your Laptop:
- Start by powering up your laptop and logging into your Linux system.
- Open the Network Menu:
- Look at the top right or bottom right corner of your screen. You should see a network icon, usually resembling a series of curved lines or a small computer screen.
- Click on this network icon to open the network menu.
- Enable WiFi:
- In the network menu, find the switch or button that says “WiFi” or “Wireless” and turn it on. This activates your laptop’s WiFi adapter.
- Select Your WiFi Network:
- After turning on WiFi, a list of available networks will appear. Look for your network’s name (SSID) in this list.
- Click on your network’s name to select it.
- Enter the Password:
- A prompt will appear asking for the WiFi password. Type in the password carefully.
- Click “Connect” or “Join” after entering the password.
- Connect to the Internet:
- Your laptop will now attempt to connect to the WiFi network. This may take a few seconds.
- Once connected, you’ll see a notification, and the network icon will show a connected status.
Troubleshooting Connection Issues
- WiFi Not Turning On:
- Ensure your WiFi adapter is properly installed and enabled. You can check this using the terminal with the command: rfkill list. If WiFi is blocked, unblock it with rfkill unblock wifi.
- Make sure your laptop’s hardware switch for WiFi (if available) is turned on.
- No Networks Found:
- Make sure you are within range of the WiFi network.
- Restart your laptop and router.
- Ensure your WiFi drivers are installed and up to date. You can usually install drivers with the command: sudo apt-get install <driver-package>.
- Incorrect Password:
- Double-check the password and make sure it matches exactly, including any uppercase and lowercase letters.
- Retype the password and try connecting again.
- Network Manager Issues:
- Sometimes, the network manager service might need a restart. Open the terminal and type: sudo systemctl restart NetworkManager.
5. Common WiFi Connection Issues and Fixes: Navigating the Digital Rapids
1. The Password Puzzle
Issue: You type in the password, but the connection won’t budge.
Diagnose:
- Check Your Password:
- Verify that you’ve entered the correct password. Even one wrong character can block your way.
- Watch the Caps:
- Pay attention to uppercase and lowercase letters. They can throw off your password.
- Ask for Help:
- Seek assistance from someone who manages the WiFi network. They might spot something you missed.
2. The Hidden WiFi Wilderness
Issue: Your device can’t find any WiFi networks nearby.
Diagnose:
- Search Again:
- Prompt your device to search again for WiFi networks. Sometimes, it just needs a little more time.
- Get Closer:
- Move closer to the WiFi source. Weak signals become stronger when you’re nearby.
- Restart the Router:
- Give the WiFi router a short break. Turning it off and then back on might wake up the WiFi signals.
3. The Tricky Connection Trouble
Issue: Your device says it’s connected, but you can’t go online.
Diagnose:
- Check the Settings:
- Review your device’s internet settings. Ensure everything is properly configured for internet access.
- Restart the WiFi Box:
- Provide a brief rest for the WiFi router. Turning it off and then on again might resolve the issue.
- Try a Different Channel:
- Change the WiFi channel. Sometimes, interference on the current channel can disrupt the connection.
6. Conclusion: Mastering the WiFi Realm
Congratulations, intrepid WiFi explorer! You’ve journeyed through the twists and turns of the digital landscape, conquering common connection challenges with courage and determination. Armed with newfound knowledge, you’re now ready to navigate the WiFi realm with confidence.
Should you encounter further obstacles on your digital odyssey, fear not! There are myriad resources available to assist you on your quest for connectivity. Explore additional blogs, forums, and tech communities for in-depth troubleshooting tips and tricks.
And remember, if you find yourself in need of expert guidance, don’t hesitate to reach out to Hire IT Expert. Our team of seasoned professionals stands ready to tackle any technological challenge, ensuring that no WiFi woe remains unsolved.
So, dear reader, continue your exploration of the digital frontier with zeal and curiosity. The WiFi realm awaits, and with the right knowledge and support, there’s no limit to what you can achieve.