
Introduction
Audio Troubleshooter: If you’re a Dell laptop user encountering sound problems like no sound or speakers not working, you’re not alone. This guide actively troubleshoots issues such as “Windows 11 no sound,” providing straightforward solutions to ensure your audio functions smoothly.
Table of contents
1. Checking Volume Settings in the System Tray:
Click the speaker icon in the bottom-right corner of your screen to check volume settings in the system tray. Ensure the sound is not muted and adjust the volume slider. Verify audio output by playing a sound file.
- Look for the speaker icon in the system tray, typically located in the bottom-right corner of the screen.
- Click on the speaker icon once to open the volume slider.
- Drag the volume slider up to increase the volume and down to decrease it.
- Make sure the volume is not muted. If the speaker icon displays a red “x” or a muted symbol, click on it to unmute the sound.
- Under the “Output” section, you’ll see a volume slider. Adjust it to increase or decrease the volume.
- Ensure you turn up the master volume and unmute the device volume. Additionally, adjust the volume for individual apps if necessary.
2. Verifying Hardware Connections:
Securely plug your speakers or headphones into the correct audio port on your Dell laptop to verify hardware connections. Check for loose or damaged cables and test the device for sound output.
- Locate the Speakers/Headphones Ports:
- Find the audio output ports on your Dell laptop. These are usually located on the sides or front of the laptop.
- Inspect the Connection:
- Carefully examine the connection between the speakers or headphones and the laptop’s audio port.
- Ensure Secure Connection:
- If using wired speakers or headphones, ensure that the audio jack is securely plugged into the laptop’s audio port.
- Check for Damage:
- Look for any signs of damage or wear on the audio cable and the laptop’s audio port. Damaged cables or ports can cause connectivity issues.
- Test the Connection:
- Once connected, gently tug on the cable to ensure it’s snugly plugged in. Wiggle the connector slightly to see if there’s any looseness or intermittent connection.
- Try Different Ports (If Available):
- If your laptop has multiple audio ports, try plugging the speakers or headphones into a different port to rule out a faulty port.
- Test with Alternative Device:
- If possible, test the speakers or headphones with another device (e.g., smartphone or tablet) to verify if they’re functioning properly.
- Check for Sound Output:
- After confirming the connection, play some audio on your laptop and listen for sound output from the speakers or headphones.
- Adjust Volume:
- If the sound is too low, turn up the volume on both the laptop and the speakers/headphones to an audible level.
3. Updating Audio Drivers:
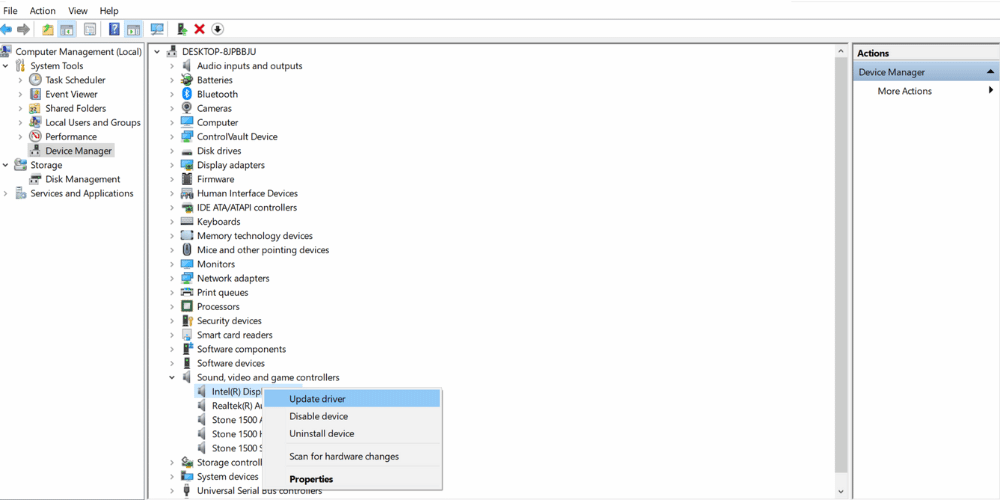
Update audio drivers by opening Device Manager, finding “Sound, video and game controllers,” right-clicking your audio device, selecting “Update driver,” and following the on-screen instructions.
- Open Device Manager:
- Press the Windows key + X on your keyboard to open the Quick Link menu.
- Select Device Manager from the list of options.
- Locate Audio Devices:
- In the Device Manager window, locate and expand the “Sound, video and game controllers” category.
- Find Audio Drivers:
- Look for the audio device driver(s) listed under this category. It may be labeled as “Realtek High Definition Audio” or similar.
- Update Driver Software:
- Right-click on the audio device driver and select “Update driver” from the context menu.
- Choose Update Method:
- In the Update Driver Software window, select the option that allows you to search automatically for updated driver software. This will prompt Windows to search for the latest drivers online.
- Follow On-screen Instructions:
- Follow any on-screen prompts to complete the driver update process. Windows will download and install the latest compatible audio driver for your Dell laptop.
- Restart Your Laptop:
- Once the driver update is complete, restart your laptop to apply the changes.
- Verify Driver Update:
- After restarting, revisit Device Manager to ensure that the audio driver has been successfully updated. Look for any error indicators, which may indicate a problem with the update.
- Test Audio Output:
- Finally, test the audio output on your Dell laptop to ensure that the sound issue has been resolved. Play some audio or video files to verify that sound is now working properly.
4. Troubleshooting Windows Sound Settings:
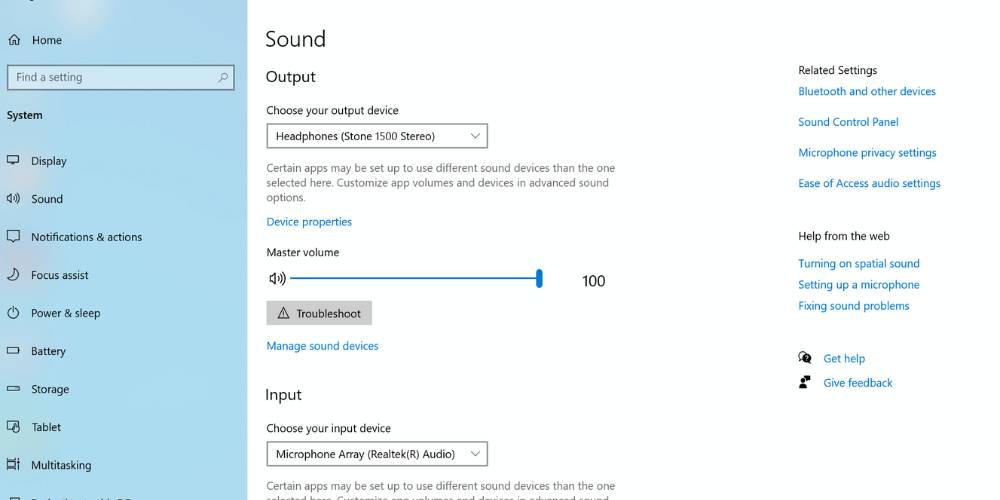
To troubleshoot Windows sound settings, open Settings > System > Sound. Ensure the correct playback device is selected and adjust the volume. Test sound output and try different settings if needed.
- Open Settings:
- Click on the Start menu and select the gear icon to open Settings.
- Navigate to Sound Settings:
- In the Settings window, click on the “System” category.
- Select Sound:
- From the sidebar menu, choose “Sound.”
- Check Playback Devices:
- Under the “Output” section, review the list of available playback devices.
- Select the correct audio output device (e.g., speakers or headphones) as the default playback device. Click on the device to select it if needed.
- Adjust Volume and Sound Enhancements:
- Adjust the volume slider to increase or decrease the volume level as desired.
- Explore any sound enhancements or effects options available in the sound settings. Experiment with different settings to troubleshoot the sound issue.
- Test Sound:
- After adjusting the settings, play some audio or video files on your Dell laptop to test the sound output.
- Listen for sound from the selected playback device and verify if the issue has been resolved.
- Try Different Apps:
- If sound is still not working in specific apps, try playing audio or video files in different applications to determine if the problem is app-specific.
- Restart Your Laptop:
- If you’ve made changes to the sound settings, restart your laptop to apply the changes effectively.
- Update Windows:
- Ensure that your Dell laptop is running the latest version of Windows 11. Check for and install any available updates, as they may include fixes for sound-related issues.
5. Checking Audio Services:
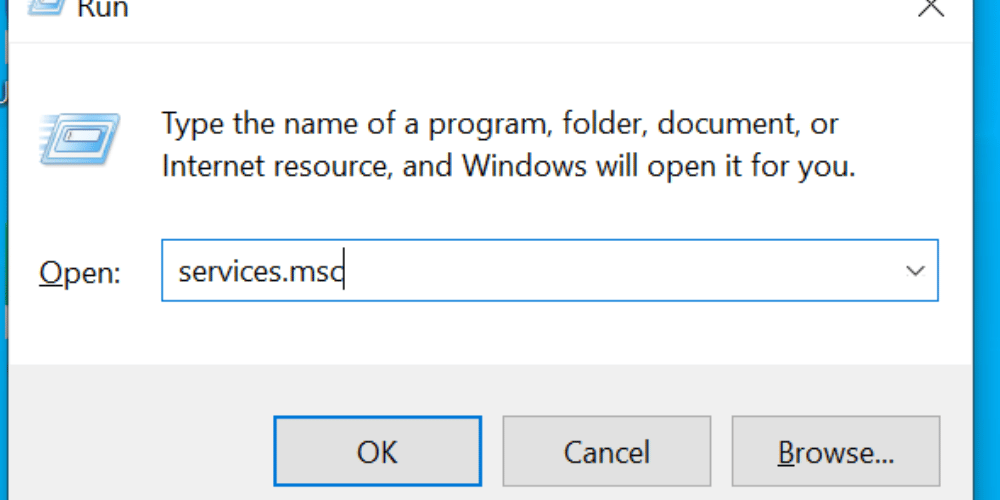
To check audio services, open Run (Windows key + R), type “services.msc,” and press Enter. Ensure “Windows Audio” and related services are running, restart any stopped services.
- Open Run Dialog:
- Press the Windows key + R on your keyboard to open the Run dialog box.
- Type “services.msc”:
- Type “services.msc” into the Run dialog box and press Enter. This will open the Services application.
- Navigate to Audio Services:
- In the Services window, scroll down or use the search bar to locate audio-related services.
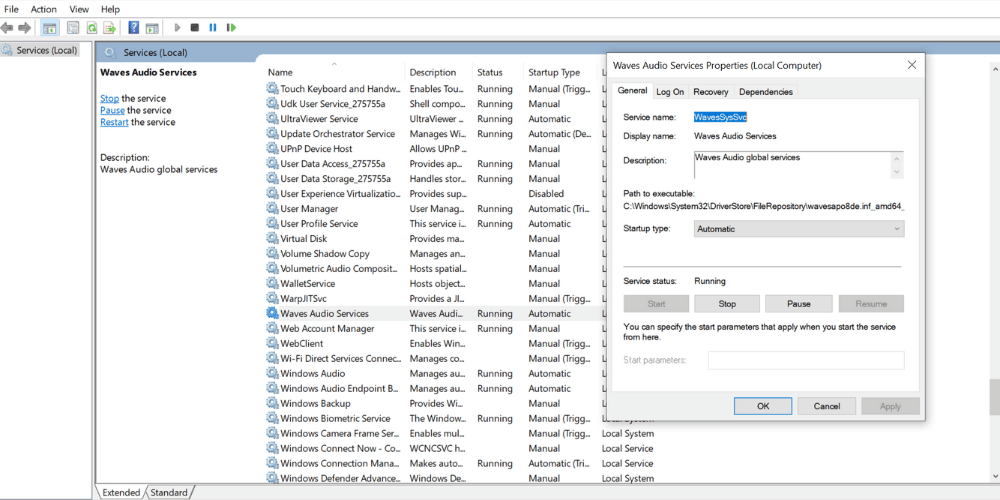
- Look for services such as “Windows Audio,” “Windows Audio Endpoint Builder,” and “Windows Audio Services.”
- Check Service Status:
- Check the status column next to each audio service. It should indicate whether the service is running, stopped, or has encountered an error.
- If any audio service is not running, right-click on it and select “Start” from the context menu to start the service.
- Restart Audio Services:
- If the audio services are running but you’re still experiencing sound issues, try restarting them.
- Right-click on the audio service and select “Restart” from the context menu. This will stop and then restart the selected service.
- Verify Changes:
- After restarting the audio services, verify whether the sound issue has been resolved.
- Play some audio or video files on your Dell laptop to test the sound output.
- Restart Your Laptop:
- If necessary, restart your laptop to ensure that any changes to the audio services are applied effectively.
6. Testing External Devices:
Test external devices by connecting them to your Dell laptop, ensuring secure connections, and playing sound files to verify proper functionality. Adjust volume and try different ports if needed.
- Connect External Device:
- Plug in the external device, such as headphones or external speakers, to the appropriate port on your Dell laptop.
- Ensure Secure Connection:
- Verify that the external device is securely connected to the laptop’s audio port.
- Check Device Functionality:
- If using headphones, ensure that they are powered on and functioning properly.
- If using external speakers, make sure they are powered on and the volume is turned up.
- Test Audio Output:
- Play some audio or video files on your Dell laptop to test the sound output through the external device.
- Listen for sound from the external device and verify if it’s working correctly.
- Adjust Volume:
- If the sound is too low or too loud, adjust the volume using the controls on the external device or through the laptop’s sound settings.
- Try Different Ports (If Available):
- If your laptop has multiple audio ports, try plugging the external device into a different port to see if the issue persists.
- Check Sound Settings:
- Ensure that the correct playback device (e.g., headphones or external speakers) is selected in the sound settings of your laptop.
- Test with Alternative Device (If Possible):
- If you have access to another device (e.g., smartphone or tablet), test the external device with it to verify if the issue is with the device itself or the laptop.
- Verify Sound Output:
- After testing, verify whether the external device produces sound output from your Dell laptop.
7. Conclusion
Troubleshooting sound issues on your Dell laptop or any laptop can be a straightforward process when following these steps. By actively engaging with your laptop’s settings, hardware, and external devices, you can identify and resolve common sound problems effectively.
If you’re still facing issues despite following these steps, don’t hesitate to contact Hire It Expert for professional tech support.
For further assistance, please contact Hire It Expert.
For more on related sound issues, explore our other blogs:
- Discover troubleshooting tips for Fix No Sound Issues on Zoom, Teams, Windows 11, and AirPods
- Dive into advanced solutions for How to Fix ‘No Sound’ Issues on Your Laptop or PC: A Comprehensive Guide
Additionally, feel free to explore our other blogs for more tech troubleshooting tips and tricks. You can find them here. Whether it’s resolving sound issues, optimizing performance, or troubleshooting software problems, our blogs cover a wide range of topics to help you make the most of your technology.
8. Frequently Asked Questions (FAQ)
A: First, turn up the volume and unmute the device. If the issue persists, check hardware connections and update the audio drivers.
A: Open Device Manager, locate the audio device, right-click, and select “Update driver.” Follow the on-screen instructions to complete the update process.
A: Yes, you can adjust volume settings for individual apps. Right-click on the volume icon and select “Open Volume Mixer” to adjust volume levels for each app.